Tuesday, 30 October 2018

Foiling Development

I have now started to foil my cover design as well as the pages of my language book. I decided that gold was most appropriate for the cover as it is the richest colour; I want my book to have a rich, classy aesthetic. I was torn between silver but gold still looked best, this was agreed with by my peers.

I first foiled onto the cartridge paper that I was planning to use as the embossing worked really well on this paper. However, the foiling came out quite patchy on this paper...but this might not be an issue when I foil properly using a heat press instead of the laminator.

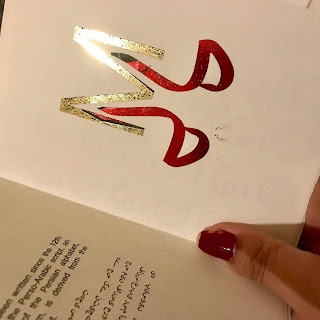
Additionally, I found that the foiling worked loads better on the antique white paper that I later purchased; the foil looked a lot smoother. Also, the foiling on the antique white paper image shows the foil design that I have decided to go with for my final cover, this one looked best out of my 3 initial designs. I felt that the other designs looked a little too pastiche.

Foiling on cartridge paper

Foiling on antique white paper

I have created a mockup version of my language book which uses foiling on all of the double page spreads (on the letter pattern page). Some of the pages turned out better than others, but hopefully this won't be an issue when I foil the final book properly. I also used the antique white paper for these mockup pages. I am happy with how they turned out.

I now need to emboss the cover with foil to go with the mockup as a hardback cover, this will shown at Fridays critique.


I also foiled my pages onto red paper using silver foil. I really like how these turned out as the silver looks really rich and classy on the darker paper which is what I want. However, the only issue is that the silver is quite hard to read for the small text...Another idea is that I could just print the text in white without foil. In Fridays critique, I will ask if people prefer the antique white paper version or the red paper version.



Sunday, 28 October 2018

Further Page Developments

After my trip to Colours May Vary, I have started to think more thoroughly about the layout of my double page spreads. The layouts that I have been experimenting with the past week feel a little bit too basic, the layouts do still need to look minimal as language books can be often be confusing.

As my cover uses a detailed mandala pattern on it, I thought the idea of pattern could also run through my double page spreads on the page where singular letters are used. The idea of a singular letter with the Arabic equivalent to the letter would still be on every right page, but the idea of pattern would be explored instead of just using the two singular letters. The patterns would experiment with repetition, scale and composition, reflection, shape and outlines.

I also don't want my book to be too busy and jam packed- making it more confusing. This is why I have limited the amount of pages down to 9- Urdu is spoken in 9 different countries; Pakistan, Afghanistan, Persian Gulf countries, Saudi Arabia, United Kingdom, United States, Canada, Norway and Australia.


The English letter and the Arabic letter would still be foiled in different colours. These are the mockups of the 9 pages that I will print and foil this coming week. I will then present them to my peers and tutors to gain feedback on which areas need developing. 


Saturday, 27 October 2018

Colour May Vary Research

Today I visited Colours May Vary in order to gather some more research and inspiration for my book. I know how I want my book to look aesthetically as well as the techniques and sizes I want to use for everything, I am just a little unsure on how I want the layout of my double page spreads to look.

The layouts that I have already experimented with feel a little bit too simple; however, the pages do need to look minimal as language books can be quite confusing. I also know that I want my book to have a rich, classy and minimal aesthetic, so a busier page layout may not be appropriate. Using a modular grid throughout the book may would be something to consider.

Additionally, during my visit to Colours May Vary, I paid more attention to book layout rather than covers and techniques;

The first image below relates to my book in terms of pattern- my book cover uses a detailed mandala pattern on the cover, however I really like the simplicity of these patterns. This book has also made me consider using a grid throughout my book. In the second photograph, I enjoyed the variation of the different point type.


I really liked the business of the pages in the photographs below; I usually like to make my work look really crazy and abstract. I also really liked the colour palette in the second image. However, this wouldn't be appropriate for this brief as my book needs to have a minimal aesthetic.


These images show a more minimal layout which is more appropriate for my book. The composition of the type with the simple illustrations/shapes works extremely well. This is similar to how I want my double page spreads to look too, one page contains the body of text with the other page with the two English and Arabic letters laid out in a more illustrative way.


The book below is called 'Oh shit what now?- Honest advice for new graphic designers'. I loved the layout of every page throughout this book, it experiments thoroughly with the scale of the typography, grid systems, colour palette, layering etc.


More books that I found interesting:

I loved the cut-out detailing in this
front cover
The singular foiled shape looks
extremely effective against the
matte cover

Interesting shape for a book

I loved the binding of this book- however it would be too expensive for me to use a leather cover for my book- an alternative would be the leather texture paper that G.F Smith provide.

Cover Foiling Preparation

I have started to prepare the designs for where I want the foil on the front cover of my book. The black shows the original design which will be embossed, the purple shows where the design would be foiled. I experimented with 3 different designs because the cover will look different when it is physically foiled and embossed, I also created a few as I wasn't sure if the foiling would look best minimal or more detailed.


These designs show the foiled sections on their own. At the moment I think I prefer the minimal design (first) more than the two more detailed ones, however I might change my mind when I actually create test covers next week.


Friday, 26 October 2018

G.F Smith Visit

Today we had a visit from the company G.F Smith, they offers paper products, special makes and highly bespoke services tailored specifically to customers as well as popular and smaller brands of the creative industries. I found the talk extremely interesting as I never realised how interesting and varied paper could actually be.

They had a wide range of samples out for us to look at which was useful as this brief is all about production methods; paper stock and paper techniques are extremely important towards this. It was also helpful since they had a lot of samples which combined embossing and foiling, which is what I want to use throughout my book.

Images of samples I found interesting and relevant to the production of my book:

Textured foiling

Gloss foiling onto matte paper

Black foil on black card

Interesting paper textures used for envelopes

Embossing, de-bossing and foiling all in one

Foiled emboss design

Foiling

De-bossed business card

Two different types of foil on one paper

De-bossed business card

Combination of 2 different paper stocks on one card

Thursday, 25 October 2018

InDesign Workshop

Images:

Resolution= 300ppi
Actual Size
Colour mode: CMYK or Greyscale
File format= .tif or .psd

Open the image with Photoshop if it is a jpeg to start with...
Change the resolution to 300- if you do need to change it, untick 'resample'

Image > Mode > CMYK
Save the image as TIFF or Photoshop file.

Open the InDesign file again > Rectangle Frame Tool (this allows you to place your image into the exact area you want)
Filling a frame with the image: Object > Fitting > Fill Frame Proportionally

Click on the 'Links' palette, select each image and look at the 'link info' just to confirm all the settings are right.
IF you need to edit the image size again, right click the frame with it in and open with Photoshop. Change the percentage in Photoshop to the same percentage that it is in InDesign. The image will automatically update in Indesign.

Booklet:

File > New Document > Print...choose the size you want if its one of them.
-Have to work in a multiple of 4 pages
-Keep Facing Pages ticked
-Margins > bleed and slug > 3mm for all

Saddle stitch book binding:

-First and last page is a single page not a spread.

How the pages would be printed for a 16 page booklet for example:

L                  R
16                1
2                  15
14                3
4                  13
12                5
6                  11
10                7
8                  9

When printing:

  • Print booklet
  • Booklet type: 2-up saddle stitch
  • Print settings
  • General > choose the correct printer > tick print blank pages 
  • Setup > Paper size (ONLY if bigger than A4, select A3, A5 would stay A4) > Orientation: the second option 
  • Marks and bleeds > tick crop marks
  • Click printer > Show details > Two sided: short edge binding (always for a saddle stitch)
  • Print 
  • Preview, check it is all how its meant to be